Tag Archive for: NCAT Southeast

By Margo Hale, NCAT Southeast Regional Director, Armed to Farm Program Director, and Agriculture Specialist

Last week, I shared a few thoughts about getting started with livestock.

In the Getting Started with Livestock Podcast, NCAT Livestock Specialist Linda Coffey and I discussed our farm goals, how our livestock enterprises help us meet those goals, and how the goals influence our livestock management. On my family’s farm, we want our livestock to make money, so we are always looking for cost-saving ideas. We also want our livestock enterprises to be easily managed without too much labor. We are a busy family and have focused on time- and money-saving systems.

I want to share with you a few pieces of infrastructure and equipment we have on our farm, why they work for us, and ways they don’t work. I always find it helpful to see how other farmers feed and water their animals. Maybe you will get ideas that you can implement on your farm—or you can send me ideas for improvement.

Watering Systems

As Linda and I discussed in the podcast, providing water is one of the first things you must figure out. On our farm we have a pond, a well, and county water. We also collect rainwater from our barn and sheds. We use all these resources to water our animals on different parts of our farm, depending on how we have our pastures divided and animals separated.

We try to find cost-effective ways to do most everything on our farm, so we like to use recycled materials and captured rainwater as much as possible. In one of our pastures, we have gutters on part of a shed and small shelter that empty into a tub. One of our friends had new gutters installed on her house and gave us the old gutters to use around the farm.
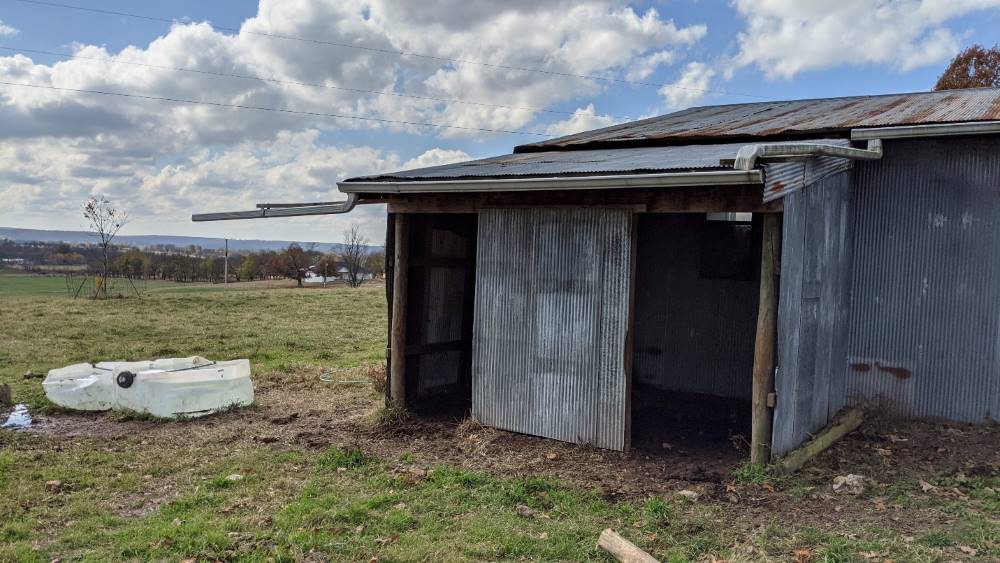
Barn with gutter attached


White water tubs for livestock

We did have a regular stock tank here, but it was too tall for our young goats to reach. We had an old IBC tote that we weren’t using, so we cut it in half to use as a waterer. This works great for the goats, but when cows are in this pasture, they tend to stand in these low totes, dirtying the water. It doesn’t take much rainfall to fill this water tub. We do have a water hydrant nearby that we can use to fill the tubs if there hasn’t been enough rainfall.

Metal barn with barrel for water catchment and gravity-fed bowl waterer.

We have a small pasture next to our barn that we use when we have pigs and when our goats are kidding. Our free-range laying hens like to hang out in the barn, so they use this waterer, too. There is a 55-gallon barrel that captures rainwater and fills the bowl waterer, pictured above. The gravity-fed bowl is mounted over a small concrete pad, so the animals (pigs especially) don’t make a muddy mess around the waterer. We don’t often graze our cows in this small pasture, but when we do, this waterer doesn’t work too well. Several cows can empty that 55-gallon barrel quickly!


We use a similar set-up at our chicken coop (pictured above right). We have a coop with nest boxes and an enclosed run built on the back side of our shop. The hens have free range of our pastures, but we shut them in the coop at night. Once again, we use gutters on their coop roof, draining in to an elevated 55-gallon barrel. There is a hose from the barrel to a water bowl with a float. Our winters are fairly mild so we can use this system year-round. On occasion, the bowl and hose freeze and we have to carry water to the chickens. We have used this for our flock of about 20 chickens for about seven years, and I’ve only had to put water in the barrel a couple of times.

Hay-feeding Systems

We are in hay-feeding season on our farm, so I will share with you the equipment we use to feed hay.

A metal hay feeding ring with goats standing on the hay inside.

We use a hay ring (above) to feed our cows, but this is problematic if you have goats or sheep. We have a few young goats with our cows right now to keep them away from our billy. They prefer to eat standing on top of the hay, soiling the hay and causing a lot of waste.
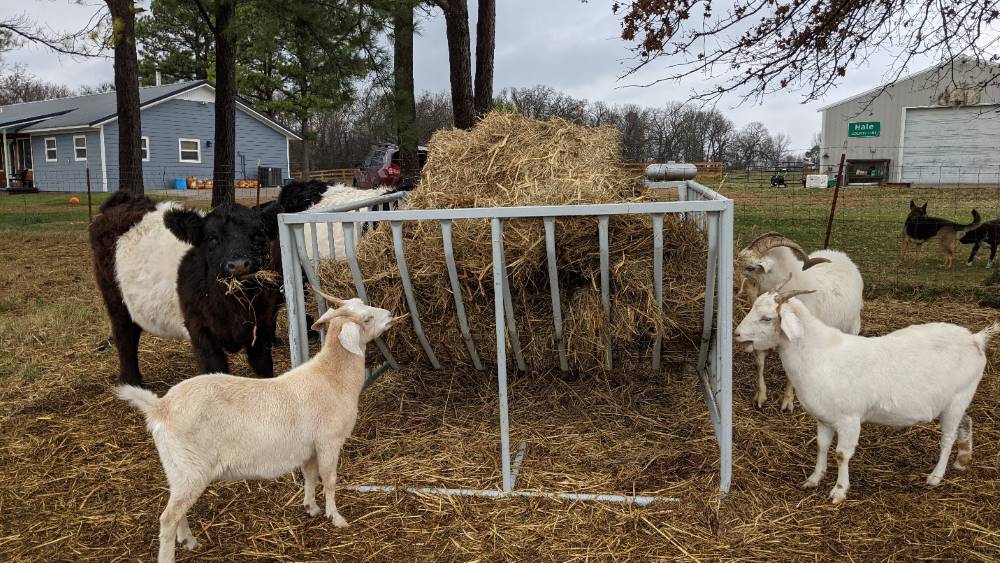
Elevated round bale feeder with goats eating hay.

We have an elevated, round bale feeder that we use for our goats. This keeps the hay off of the ground and the goats cannot get on top of it. The cows are able to easily eat out of it, too. This reduces the amount of hay they waste.

Elevated square bale feeder with goats eating hay.

We also have an elevated square bale feeder. We don’t feed many square bales (remember we want low labor), but do use them when we have goats in a small pasture right after they have kidded or are just feeding a few goats. Once again, keeping the hay off of the ground reduces waste.

We move the hay feeders to a different spot each time we feed a bale, typically feeding on an area that needs some extra fertility. There are many different ways to feed hay, but this is what works for us on our farm. Unrolling round bales is a great practice, but we don’t have enough animals for that to be efficient. They would waste too much before eating the majority of the bale. We have rolled out smaller portions of a round bale, but that was time-consuming.

Learning More

There is always trial and error before you figure out what systems work on your farm. I hope this virtual tour of our farm’s watering and hay-feeding systems will help you find what will fit your situation.

The ATTRA Sustainable Agriculture publications linked below have information about infrastructure and equipment for different livestock enterprises. As always, our NCAT Livestock Specialists are available to answer your questions and provide you with additional resources. Please email or call us at askanag@ncat.org or 800-346-9140.

ATTRA Resources

Small-Scale Livestock Production

Sheep and Goats: Frequently Asked Questions

An Illustrated Guide to Sheep and Goat Production

Hogs: Pastured and Forested Production

Hooped Shelters for Hogs

Poultry: Equipment for Alternative Production

Intensive Grazing: One Farms Setup (video series: Nine Chapters)

Managed Grazing Tutorial

Photos by Margo Hale

By Guy K. Ames, NCAT Horticulture Specialist

It’s the time of year when apple and pear growers are watching their trees like hawks. . .because the crows are watching the trees, too—like, well, crows.

Ripening fruit becomes attractive to crows and many other critters. The fruit sugars are just too much to resist. And beating the other critters to the fruit is one of the reasons you need to know when to pick. This is not always as clear as you’d think because, when it comes to apples and pears, there is ripe and there is “ripe.”

Ripe for the Picking

Pome fruits, apples, pears and quince, are “physiologically ripe” (the seeds are mature) sometime before they are their sweetest and before they begin falling from their parent trees. This is important because as soon as they are physiologically ripe they can be picked and expected to finish ripening off the tree! Fruit left on the tree past this first stage of ripening will continue to sweeten and change color and texture. There is nothing wrong with letting an apple reach peak sweetness on the tree. But doing so could compromise its firmness and storability. . .and it remains on the tree for the crows to find.

Pears, at least the European types, are a somewhat different story. European-type pears—like the familiar Bartlett and Comice—ripen best off the tree. This is not true for Asian pears, which ripen fine on the tree. If left to ripen on the tree, European pears generally start ripening from the inside out and can be grainy or mushy. These pears are best picked just shy of full ripe (but physiologically ripe) then chilled and “cured.”

Curing is simply a matter of allowing the pear to reach perfection at room temperature on your kitchen counter or table. If you’re in a hurry you can put the pears in a paper bag. Bag with a banana to further hasten the process. To check for perfect ripeness, hold the pear in your hand and push on the fruit near the stem area with your thumb. When the pear gives just a little to your thumb pressure it is ready to eat.

Follow the Signs to Ripe Fruit

But back to physiological ripeness and other indicators of ripeness. Here are some important indicators:

  1. The hanging fruit begins to change color. Even green apples like Granny Smith and most pears have a subtle color shift when ripening begins in earnest, but the untrained eye might not see it. But red apples will show a more obvious color shift from green toward red as they approach ripeness.
  2. Some fruit begins to fall. This is usually a solid giveaway, but it doesn’t mean that every fruit on the tree is at exactly the same stage. As fruit approaches maturity, a layer of tissue on the stem accumulates abscisic acid in preparation to drop the apple or pear. The grower can exploit this phenomenon to determine ripeness. Gently lift a fruit from the vertical hanging position to something approaching horizontal. If the fruit is ready, the abscission layer will break cleanly where it joins the twig or spur it is attached to.
  3. The seeds are hard and brown or black. This is the surest indicator of physiological ripeness because, after all, that’s what this whole thing is all about. The fruit gets sweet to attract creatures like us to eat it and spread the seeds. If the fruit gets eaten too early, before the seeds are ready, then the whole thing was for naught! Seeds that are soft and white are not ready and the fruit isn’t ripe. If you were to pick the fruit before the seed is mature, the fruit will not continue to ripen.
  4. The fruit pleases your palate. Hey, there’s no substitute for your taste. If you like it, then it’s ready!

There are four key indicators of ripeness in apples and pears.The professionals have other tools, like a starch test and a refractometer for measuring sugars, but even the pros will use the four other indicators listed above.
Storing Apples and Pears

If your intent is to store your apples or pears, then catching them right when they are first physiologically ripe will allow you to take these fruit while still firm and store them. Sometimes they will last for months depending on what you might have to keep them cool.

Interestingly, it could be argued that pome fruits are still very much alive after picking. They are still respiring (exchanging gases like oxygen and ethylene) and starches are continuing to convert to sugars. We’ve already mentioned that European pears reach their highest flavors after storage and curing. Similarly, many apple varieties don’t achieve their finest, most complex flavors until they’ve been stored for a while.

Happy eating!

Additional Information on Apples and Pears

For more on apple and pear production, see the ATTRA Sustainable Agriculture publications Apples: Organic Production Guide and Pears: Organic Production. You’ll find many other resources on fruit production on the ATTRA website’s Fruits page, including publications, podcasts, and videos.

Guy has written several blog posts on the joys and challenges of fruit production. His previous posts include Pear Trees Exemplify Resilience, Restorative Pruning, Dwarfing Apple Rootstocks: Pros and Cons, Fall Planting Fruit Trees, and Battling Borers in Organic Apple Production.

You can contact Guy or other NCAT agriculture specialists by email at askanag@ncat.org or 800-346-9140.

By Guy K. Ames, NCAT Horticulture Specialist

At right: Juneberry fruits look quite like medium-sized blueberries, but the juneberry is actually much more closely related to apples and pears. Photo: Guy Ames, NCAT.

Of the many names for this plant, “chuckleberry” is certainly my favorite, but I’ve only seen it in writing, never heard it spoken. Around the Ozarks where I live “sarvis” or “sarvisberry” seems to be the most commonly spoken, at least among the old-timers. If a name is known at all for this berry among the newcomers to the Ozarks, “service” replaces “sarvis.”  “Sarvis,” I think, is presumed to be a thick southern linguistic variant of “service.” “Shadblow” and “shadbush” seem to me to be the weirdest names, but they are documented and widely used at least in coastal regions. (Shad is a once-common fish whose annual spawning runs up the rivers of colonial New England happened to coincide with the early springtime blooming of this tree.)

What’s in a Name

Other names include saskatoon, juneberry, blueberry tree, chuckley pear, and, of course, the Latin binomials of which there are several because within its genus, Amelanchier, there are several species. All of the species produce berries nearly indistinguishable from the others. And all these names, except and very notably the saskatoon, pass over the Native American names, which were presumably many because Amelanchier grows over a wide area and commended itself to all who ate it.

When I first moved to the Ozarks in 1971-72, the sarvisberry trees (as I first learned to call them) were the first bloomers that I would notice on the dull gray wooded hills of the Ozarks in February. In their profusion of bright, white blooms they were a welcome harbinger of spring. One probably erroneous explanation for the origin of “serviceberry” is that the blooming of the tree indicated that the soil was thawed enough to dig graves and hold services for the folks who didn’t make it through the winter.

Although it is improbable, the funereal explanation persists and I rather enjoy it. Like Persephone returning from Hades every spring, it presents a beautiful and poignant reminder of the rebirth part of the never-ending cycle of life and death.

Speaking of death, a juneberry pie or cobbler is to die for! When eaten fresh, the juneberry has a detectable almond flavor that comes from its small, edible seeds. But when cooked into pies or cobblers, that almond aroma becomes pronounced and will fill a kitchen and spill deliciously into the house!

Mistaken Identity

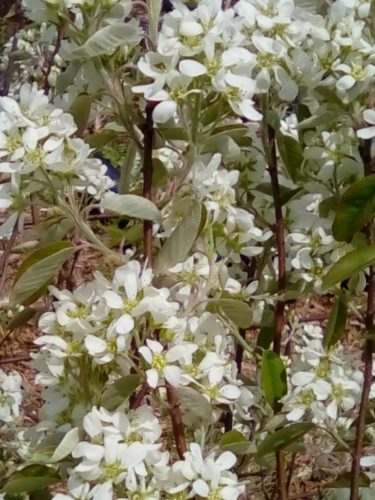
A juneberry bush full of white blossoms.

A juneberry bush in bloom. Photo: Margo Hale, NCAT.

When you first see a juneberry fruit you might have a hard time distinguishing it from a medium-sized blueberry. However, the juneberry, technically a pome fruit, is much more closely related to apples and pears than to blueberry. A few intrepid grafters have even had limited success grafting pear wood onto juneberry (graft compatibility is an indirect proof of relatedness).

Sometimes the juneberry is referred to as a tree, sometimes a bush. That difference is not just in the eye of the beholder. The species native to the Ozarks, A. arborea, like the species name suggests (arborea = tree), assumes the form of a small tree. The species that I prefer for fruit production and endemic to most of the Northeast United States, A. canadensis, is a multi-stemmed bush usually around 12 ft. tall. The saskatoon, A. alnifolia, native to the Northern Plains and into the foothills of the Canadian Rockies looks like a shorter version of A. canadensis. It usually tops out around 6-8 ft. Regardless of species, the fruit looks and mostly tastes the same.

Juneberry’s Uses

Though the Native Americans used the juneberry wherever it grew (pemmican was one way the juneberry was preserved and used), until relatively recently it has not been pressed into commercial service. That is beginning to change. The University of Saskatchewan is conducting research and breeding to commercialize the saskatoon, A. alnifolia. And in the United States, Cornell University Extension has done some limited research and promoted juneberries as an alternative to the persnickety blueberry. In Canada there is a nascent saskatoon industry marketing frozen and canned saskatoons as well as wines, jams and jellies made from saskatoons.

Whatever they’re called, they are easy to grow. They’re not nearly as finicky as blueberries regarding soil pH and watering. And, if you get the right species for your area, you’re not likely to have any disease problems (I and other growers in the Ozarks have found A. alnifolia or saskatoon to be susceptible to cedar-apple rust). And though they bloom very, very early, the blooms never seem to be damaged by late spring freezes and frosts. I have juneberries year after year, often in years that other fruit crops are wiped out by weather or disease.

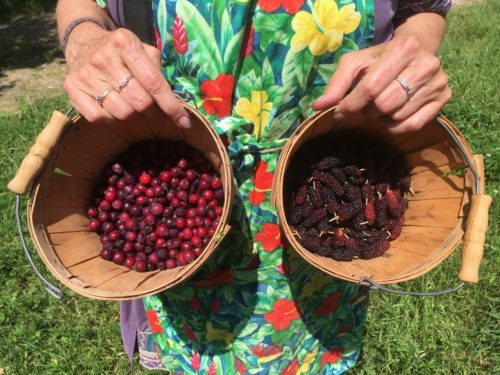
A woman holds a basket of ripe juneberries in her left hand and a basket of ripe mulberries in her right hane.

Juneberries (left) and mulberries ripen at the same time—in May, not June! Photo: Guy Ames, NCAT.

As with most small berries, the commercial viability of juneberries will revolve around harvesting costs. In Canada, researchers hope to find techniques and cultivars that will lead to the uniform ripening that allows mechanical harvesting. Elsewhere and until that happens, individual farmers will have to figure out ways to efficiently pick and effectively market the fruit to make juneberry production a viable money-making proposition. But that should not preclude gardeners and homesteaders from planting these easy-to-grow and highly productive berry plants in their gardens for home use.

Related ATTRA Resources

Fruit Trees, Bushes, and Vines for Natural Growing in the Ozarks