By Luke Freeman, NCAT Horticulture Specialist

Photo at right: Kenny Simon presenting at NCAT’s Deer Fence Workshop on October 15, 2019. Photo by Colin Massey, Arkansas Extension.

Last November we hosted a workshop in Fayetteville, Arkansas, on constructing a low-cost, solar-powered electric deer fence for a farm, garden, or food plot. Since people are planting their gardens now and the growing season is getting started, we wanted to provide a recap of the workshop with tips on constructing an electric deer fence. You can also find a video of the workshop on our YouTube channel here.

Kenny Simon, Luke Freeman, and Jenni Vaughan set up an electric deer fence.

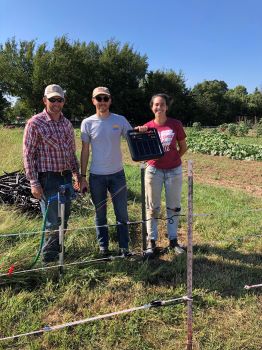
Kenny Simon, Luke Freeman, and Jenni Vaughan after finishing setting up the electric deer fence in September. Photo by Colin Massey, Arkansas Extension.

We hosted the workshop at Cobblestone Farms in Fayetteville. We had set up a solar-powered deer fence around incubator farm plots to help limit the deer damage to the incubator farmers’ crops. Many thanks to all of the individuals and small businesses who pitched in to help us purchase the fencing supplies for our incubator farmers. If you’re interested in reading more about the Woolsey Incubator Farm Project, you can find our blog post about it here.

Kenny Simon from the Arkansas Cooperative Extension Service traveled up from Little Rock to help us construct the fence in September. Our local county extension agents Ryan Neal (Benton County) and Colin Massey (Washington County) came to help, too. One of the incubator farmers, Jenni Vaughan, also helped out and learned first-hand how to construct an electric deer fence. In the weeks after the fence was put up Jenni noticed a dramatic reduction in the amount of deer damage on her okra and other vegetable crops.

Electric Deer Fence Elements

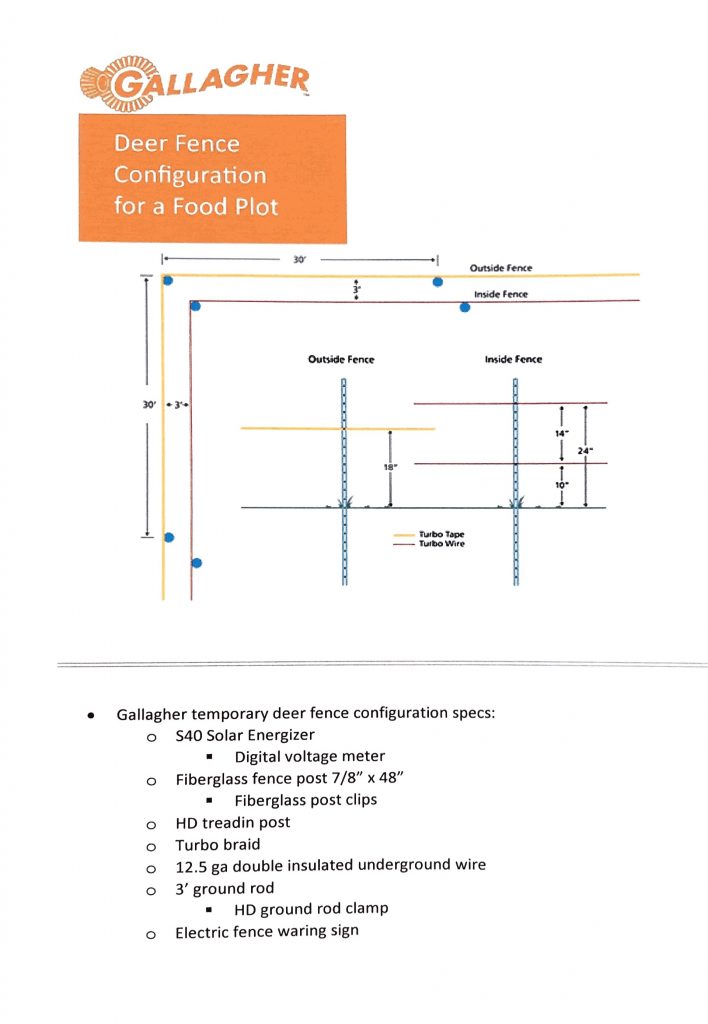
During the November workshop Kenny described the essential components of an electric deer fence. He showed participants how to set one up and check for charge. The fence design we demonstrated is a three-strand fence developed by Gallagher specifically for deer exclusion. You can see a diagram of the fence design at the end of this post. The three-dimensional element of the fence plays against a deer’s depth perception, making them reluctant to jump over. This allows the fence to effectively exclude deer even though it’s only 24 inches tall.

Energizer

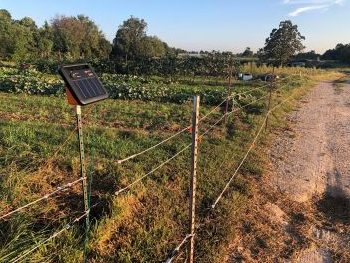
We used a Gallagher S40 solar charger for our deer fence at Cobblestone Farm. Photo by Luke Freeman, NCAT.

The first component of an electric deer fence is the energizer, which creates the electric current. An energizer can be battery-powered, solar-powered, or made to plug in to a 110 volt outlet. We chose a solar-powered charger for our deer fence because we did not have access to a nearby electrical outlet. Our charger is a Gallagher S40 rated at 0.4 stored joules. A rule of thumb is that every output joule can run 3 miles of electric fence. The charger we used also has a wildlife setting that pulses more rapidly at night when wildlife are active.

Grounding

Along with your energizer you’ll need a grounding system. A good ground is essential to delivering a shock when a deer encounters your fence. Most problems with electric fences stem from poor grounding. Another rule of thumb is that for every output joule of the energizer you need three feet of buried ground rod. Install the ground rods in soil that stays moist year-round or that you can easily water. Be sure to space ground rods at least 10 feet apart.

Volt Meter

A volt meter will allow you to test your electric fence and ensure it is working properly. Generally speaking your fence will need to run at 5,000-6,000 volts for deer, which you can check using your volt meter. Best results will come from a volt meter made by the same manufacturer as the energizer.

Wire

There are many options when it comes to the wire you use for your electric deer fence. Kenny Simon recommends using a white turbo-braid or turbo-wire for this type of deer fence configuration because of the visibility and durability. Tying colorful survey ribbon to the fence also helps improve its visibility to wildlife and humans. In general you’ll find that “poly” strands contain six or less wire filaments and “turbo” strands contain nine. The more wire filaments in the strand the greater the voltage and the greater distance the strand can carry the voltage.

Posts

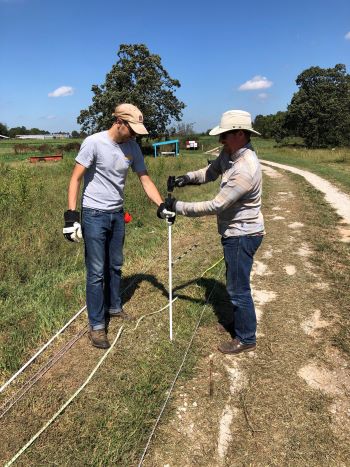
Luke Freeman and Ryan Neal pound in fiberglass in-line posts. Photo by Colin Massey, Arkansas Extension.

When it comes to posts Kenny recommends self-insulated line posts. We ended up using a combination of steel t-posts for the corners and fiberglass step-in posts for in-line. Self-insulated line posts will be flexible and support the fence in between the corner posts. Fence posts made from fiberglass, composite material, or plastic don’t carry an electric charge, so you don’t have to worry about adding insulators. You also won’t have the issue of a failed insulator causing a short in your fence. This can compensate for the added expense of self-insulated posts.

If you’re using metal posts like t-posts for your fence you must use high-quality insulators like a bull-nose insulator. The insulator will ensure the electric wire does not come into contact with the metal post, which would cause a short in the fence. In Kenny’s experience many problems with electric fences shorting out come from old insulators that break down. Grass or debris can also cause an electric fence to short out. It is important to keep the area under an electric deer fence mowed.

More Information

To learn more about setting up an electric deer fence for your farm or garden, watch the video recording from our workshop here. You can also find ATTRA Sustainable Agriculture publications on electric fencing for livestock at https://attra.ncat.org/topics/fencing-watering-systems/, including the publication “Paddock Design, Fencing, and Water Systems for Controlled Grazing.”

You can always call ATTRA’s helpline at 800-346-9140 or email askanag@ncat.org if you have questions about deer fencing, other garden pests, or any agriculture topic!

The electric deer fence configuration and supplies list we used at Cobblestone Farm:

NCAT has released  a five-part video series called “Maintaining Your Tractor” on YouTube. This series walks viewers through the three main factors that keep a diesel engine running smoothly:

  • clean air
  • clean fuel
  • lubrication

Farm and equipment educator Shane LaBrake joins NCAT Northeast Regional Director Andy Pressman (author of Equipment and Tools for Small-Scale Intensive Crop Production) at the Inn at East Hill Farm. They work on a Ford 1910 tractor from 1985. The 35-horsepower machine needed a new air filter, oil filter, and fuel filter.

Building Your Toolbox

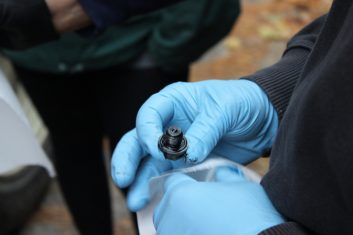
The oil drain plug from a Branson tractor.

The oil drain plug from a Branson tractor being cleaned off.

The first video in the series focuses on the tools necessary to maintain your tractor at home. Shane first reviews necessary safety measures folks should take. Then, he gets into a variety of tools including:

  • socket wrenches,
  • flat wrenches,
  • filter wrenches,
  • air compressors,
  • grease guns, and
  • drop pans.

Preparing to Do Maintenance

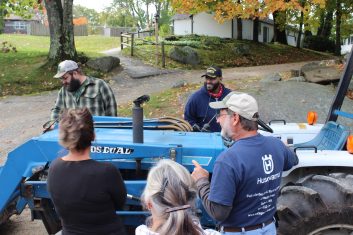
A small group stands around a blue, Ford tractor.

A group of students gets to know a Ford 1910 tractor, 35 horsepower, from 1985.

The second video covers the steps folks should take to get to know their machine. It covers checking the fan belt, oil, cooling system, and filters.

Changing the Air Filter

The Ford 1910 that Shane and Andy work on has a canister-type air filter, but the two also discuss different kind of air filters and how to replace them with new ones.

Changing the Oil and Oil Filter

Putting clean oil into the tractor was not a difficult job for Shane and Andy, but it did take a little thinking. Shane shares many tips and tricks in this video that can make the job easier.

Replacing the Fuel Filter

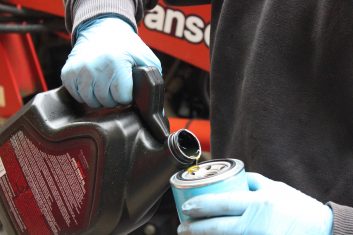
A closeup of a few drops of fresh oil being poured on an oil filter.

Before installing a new oil filter, apply a thin film of oil to the contact points to make a better seal.

In order to swap out the fuel filter on this Ford, Shane and Andy had to avoid spilling diesel fuel everywhere. This was a more complicated job, but Shane walks through the whole process. After swapping out the filter, the video covers how to bleed the air out of a diesel fuel line.

Budgeting for Maintenance

Throughout the video series, Shane and Andy discuss the cost of doing tractor maintenance at home. It isn’t cheap to buy tools, learn the skills, and budget the time to perform these services. However, it’s a lot cheaper than paying for dealer hauling fees and labor hours. Plus, the two explore ways around the costs, such as teaming up with neighbors, sharing tools, and working together.

If you ever have questions about your equipment and how to keep it running in the long term, reach out to our agriculture specialists at askanag@ncat.org, or by calling 800-346-9140.

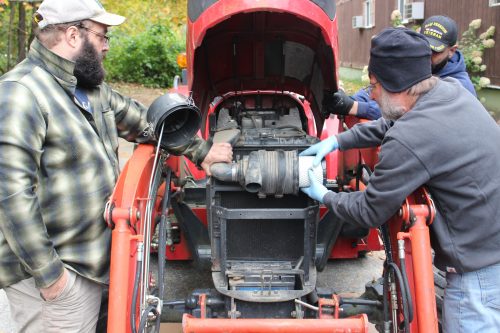
Two men on either side of a tractor with its hood open remove the air filter.

The air filter on this Branson tractor can be easily pulled out and replaced.

By Jeff Schahczenski, NCAT Agricultural and Natural Resource Economist


American farmers are stepping up to demonstrate that agriculture can be an important part of the climate solution by improving the resilience of America’s food system, reducing emissions, and facilitating on-farm production of renewable energy. Now, thousands of U.S. farmers and ranchers have signed a joint letter calling on partners in the private and public sector to help advance these solutions and invest in our rural and agricultural communities.

One farmer who signed onto the letter is Nina Prater, a soil health specialist for the National Center for Appropriate Technology (NCAT) and a farmer in Cedarville, Arkansas. “As a farmer, I understand first-hand how intricately my livelihood—and the entire system of food production—is tied in with nature. Climate change is throwing all natural patterns out of order, and this disrupts our ability to produce food in an economically viable way. Farmers are uniquely positioned to help solve the problem of climate change through soil carbon sequestration,” Prater said.

NCAT encourages other farmers and ranchers to add your name to the letter. There is a version in English and a version in Spanish. You can read the letter at these links and add your name.

Montana farmers Doug and Anna Crabtree. Photo: Courtesy of Vilicus Farms

Montana farmers Doug Crabtree and Anna Jones-Crabtree. Photo: Courtesy of Vilicus Farms

In November 2019, NCAT agriculture economist Jeff Schahczenski co-authored a major report on agriculture and climate change that identified federal policy initiatives that would support farmers who are committed to being part of the climate solution. The report, published by the National Sustainable Agriculture Coalition, identifies policy opportunities to:

• build soil organic matter, soil health, and agricultural resilience;

• sequester C in soil and above-ground biomass;

• reduce greenhouse gas emissions;

• use resources sustainably; and

• maximize energy conservation.

NCAT is working with NSAC and its 116 member groups to make sure farmers have a direct voice in the national conversation about climate solutions in agriculture. In just a few months, more than 2000 farmers and ranchers from nearly every state have signed the letter. We have been overwhelmed with the response and want to build on this momentum!

If you are a food producer, please add your voice by April 15. Email addresses and contact information captured through the Google forms document will not be shared, sold, or retained by NSAC or any other party. Click here to read the letter and add your name.

Later this spring, NCAT, NSAC and partner groups will share this Farmer Letter on Climate Change in meetings with members of Congress, USDA program leaders, and other key decision-makers to urge effective policy action to combat climate change, and especially to help farmers and ranchers weather the storm and lead the way towards a more resilient future.

If you have any questions about the letter, contact Jeff Schahczenski at jeffs@ncat.org.

It Takes More Than a Nip and a Tuck, but You Can Bring Those Old Trees Back Into Production

By Guy K. Ames, NCAT Horticulture Specialist

Long-neglected fruit trees quite often simply die of disease or trunk borer damage, especially in the South where I live.  But if they don’t die, one of the two most common problems with aging fruit trees is growth so tall that the thought of pruning and harvesting them just seems impractical and intimidating.  The second most common problem is that old, overgrown trees tend to become unproductive, especially of good quality fruit.  “Restorative pruning” or “rejuvenative pruning” are terms used to describe techniques to bring old, too tall, and unproductive trees back to a manageable and productive state.

A Central Principle

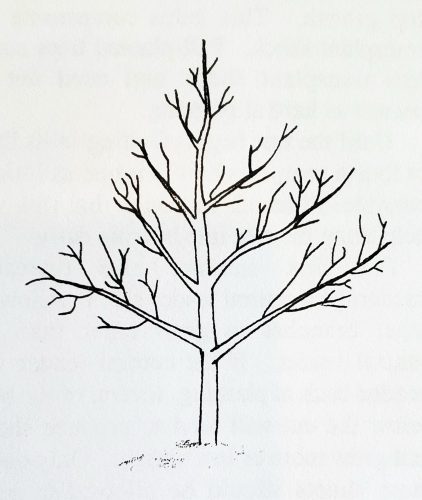
Ideal central leader form. Illustration courtesy Guy Ames.

Starting with the tree that is simply too tall to efficiently manage, we must first determine what the natural growth habit of that tree is.  Apples, pears, and—to a slightly lesser degree—sweet cherries naturally assume a more-or-less pyramidal form, with one so-called “central leader” taller and stouter than any other upright growing shoot.  Such trees are described by horticulturists as exhibiting “apical dominance,” meaning the apex or top of the tree dominates the growth pattern of the overall tree.  When this natural growth habit is violated—that is, when the central leader is cut back to any significant degree—the tree will likely respond by sending up many, many candidates to be the new leader.  It’s like a king or queen that dies without heirs.  Many pretenders to the throne will arise!

And the further down the trunk you cut the central leader, the more these vertical shoots proliferate and the more vigorous these shoots will be.  They will crowd the center of the tree, blocking sunlight and air. Such vertical shoots tend not to be fruitful.  So, then, the first principle to respect in bringing down the height of a central leader-type tree (apples, pears, and sweet cherries) is to not try to cut out too much at once.  Don’t try to cut a 30-foot tall apple tree down to 12 feet in one fell swoop!  Plan for a two, three, or four year process, depending on the size of the tree currently.

The Modified Central Leader System

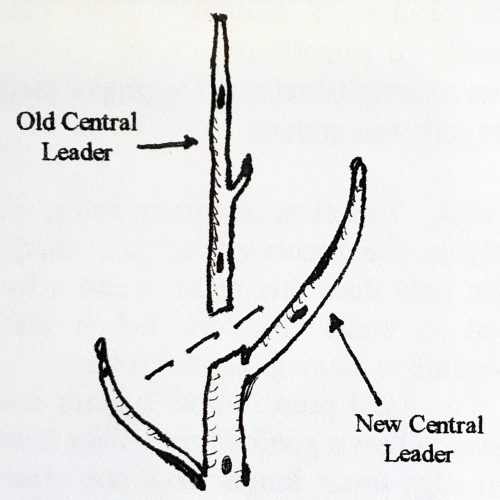
Modified central leader cut. Illustration courtesy Guy Ames.

At the same time and just as important, when you’re cutting back the central leader, pick another more-or-less upright growing shoot to become the new central leader.  This new central leader will probably arise from the same main trunk. It should be a few feet shorter than the leader you cut out.  Once you’ve chosen the new central leader, other serious contenders for tallest shoot should be cut back, preferably to a more horizontal growing limb.  This pruning/training system is called “the modified central leader” system. That, or the “multiple central leader” system (see below), should be the way you maintain the desired height of a fruit tree once it first reaches the desired height.  In other words, you will probably be choosing a new leader each year after the tree reaches the height you want.

The Multiple Leader System

When you’re faced with a very large, old tree, a new central leader may not be enough.  In such cases, choosing multiple leaders might be the best choice.  In essence what this will look like is three or four “secondary trees,” all growing and contained in the canopy space of the original, single tree.  Instead of having one big pyramidal tree on one big trunk, you’ll have two, three, or more secondary trunks branching off of the main trunk.

Each of these secondary trunks, then, will have its own central leader, resulting in multiple leaders for the tree as a whole.  To be honest, it’s probably rare that such a tree ever looks perfectly balanced among the several secondary trees. That is not important.  What’s important is that you maintain the trees “need” for apical dominance among these several secondary trunks. If you don’t choose a leader or leaders yourself, the tree will waste energy and crowd the interior of the tree with multiple wannabe leaders.

Big Thinning Cuts

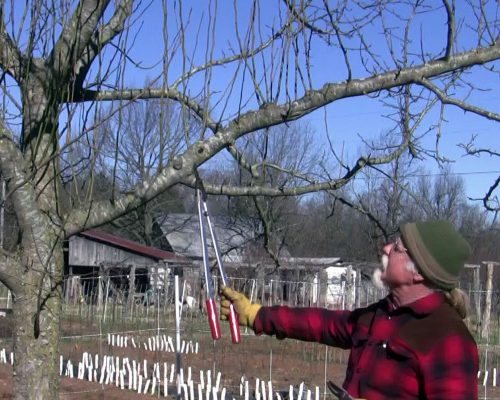
The sheer amount of wood in an old tree can be intimidating!  For this reason alone, after choosing the new leader(s), you will serve your purposes best if you focus on removing a few big branches.  An important—maybe the most important—purpose of pruning is to thin out the interior of the canopy for sunlight and wind penetration.   An old rule of thumb is that a full-grown robin should be able to fly through the tree’s canopy.  Removing any large branches that are growing straight up (not including the central leader!) or back into the center of the tree is a good place to start.  And making thinning cuts rather than heading cuts will make your work lighter next year and the year after that.

To fully understand the distinction, especially the tree’s response to these different types of cuts, refer to ATTRA’s Pruning for Organic Management of Fruit Tree Diseases.  But basically a thinning cut is cutting a branch or shoot back to where it joins with another branch or the trunk.  In other words, where a branch forks, take off one fork, usually the one growing the most upright or back into the interior of the tree.  To repeat, restorative pruning relies on opening up that tree, so stand back and look at the tree. See if you can choose a few—three or four—large branches that will open up the tree but still leave the tree looking balanced.

Patience and Persistence 

The author points to a profusion of “water sprouts,” new, upright-growing sprouts caused by cutting back the central leader.

Patience and persistence are the next things you will need to bring these old trees back to a manageable and productive state.  Even if you do a good job picking a new central leader or multiple leaders, in the first year and with the first main cut(s), the old tree is almost certain to produce an abundance of upright growing shoots sometimes called “water sprouts.”  You will have to be patient and persist in pruning out those upright growing sprouts. Manage this tree to satisfy the criteria leading to good fruit:  thin out the interior of the tree for sunlight and air penetration, favor outward-growing limbs and shoots, and always remove diseased wood and branches that are rubbing against each other.

It might take three or even four years before the tree is in a more manageable state and back to producing large, quality fruit. But once and well done, the tree will be back to something much more easily managed and almost certainly more productive.

Find Out More

To learn more about pruning, see the ATTRA Sustainable Agriculture videos Pruning Fruit Trees: Tools and Tips and Pruning Fruit Trees: An Introduction. Feel free to contact the ATTRA help line at 800-346-9140 or email askanag@ncat.org if you have questions. We’re here to help!

By Guy K. Ames, NCAT Horticulture Specialist

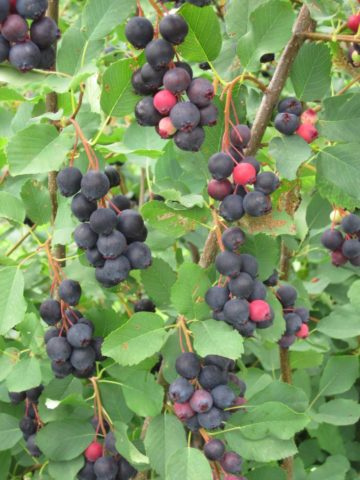
At right: Juneberry fruits look quite like medium-sized blueberries, but the juneberry is actually much more closely related to apples and pears. Photo: Guy Ames, NCAT.

Of the many names for this plant, “chuckleberry” is certainly my favorite, but I’ve only seen it in writing, never heard it spoken. Around the Ozarks where I live “sarvis” or “sarvisberry” seems to be the most commonly spoken, at least among the old-timers. If a name is known at all for this berry among the newcomers to the Ozarks, “service” replaces “sarvis.”  “Sarvis,” I think, is presumed to be a thick southern linguistic variant of “service.” “Shadblow” and “shadbush” seem to me to be the weirdest names, but they are documented and widely used at least in coastal regions. (Shad is a once-common fish whose annual spawning runs up the rivers of colonial New England happened to coincide with the early springtime blooming of this tree.)

What’s in a Name

Other names include saskatoon, juneberry, blueberry tree, chuckley pear, and, of course, the Latin binomials of which there are several because within its genus, Amelanchier, there are several species. All of the species produce berries nearly indistinguishable from the others. And all these names, except and very notably the saskatoon, pass over the Native American names, which were presumably many because Amelanchier grows over a wide area and commended itself to all who ate it.

When I first moved to the Ozarks in 1971-72, the sarvisberry trees (as I first learned to call them) were the first bloomers that I would notice on the dull gray wooded hills of the Ozarks in February. In their profusion of bright, white blooms they were a welcome harbinger of spring. One probably erroneous explanation for the origin of “serviceberry” is that the blooming of the tree indicated that the soil was thawed enough to dig graves and hold services for the folks who didn’t make it through the winter.

Although it is improbable, the funereal explanation persists and I rather enjoy it. Like Persephone returning from Hades every spring, it presents a beautiful and poignant reminder of the rebirth part of the never-ending cycle of life and death.

Speaking of death, a juneberry pie or cobbler is to die for! When eaten fresh, the juneberry has a detectable almond flavor that comes from its small, edible seeds. But when cooked into pies or cobblers, that almond aroma becomes pronounced and will fill a kitchen and spill deliciously into the house!

Mistaken Identity

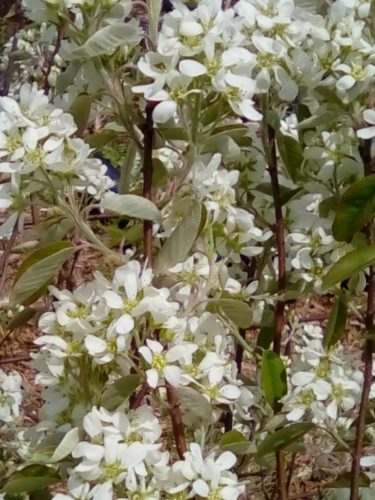
A juneberry bush full of white blossoms.

A juneberry bush in bloom. Photo: Margo Hale, NCAT.

When you first see a juneberry fruit you might have a hard time distinguishing it from a medium-sized blueberry. However, the juneberry, technically a pome fruit, is much more closely related to apples and pears than to blueberry. A few intrepid grafters have even had limited success grafting pear wood onto juneberry (graft compatibility is an indirect proof of relatedness).

Sometimes the juneberry is referred to as a tree, sometimes a bush. That difference is not just in the eye of the beholder. The species native to the Ozarks, A. arborea, like the species name suggests (arborea = tree), assumes the form of a small tree. The species that I prefer for fruit production and endemic to most of the Northeast United States, A. canadensis, is a multi-stemmed bush usually around 12 ft. tall. The saskatoon, A. alnifolia, native to the Northern Plains and into the foothills of the Canadian Rockies looks like a shorter version of A. canadensis. It usually tops out around 6-8 ft. Regardless of species, the fruit looks and mostly tastes the same.

Juneberry’s Uses

Though the Native Americans used the juneberry wherever it grew (pemmican was one way the juneberry was preserved and used), until relatively recently it has not been pressed into commercial service. That is beginning to change. The University of Saskatchewan is conducting research and breeding to commercialize the saskatoon, A. alnifolia. And in the United States, Cornell University Extension has done some limited research and promoted juneberries as an alternative to the persnickety blueberry. In Canada there is a nascent saskatoon industry marketing frozen and canned saskatoons as well as wines, jams and jellies made from saskatoons.

Whatever they’re called, they are easy to grow. They’re not nearly as finicky as blueberries regarding soil pH and watering. And, if you get the right species for your area, you’re not likely to have any disease problems (I and other growers in the Ozarks have found A. alnifolia or saskatoon to be susceptible to cedar-apple rust). And though they bloom very, very early, the blooms never seem to be damaged by late spring freezes and frosts. I have juneberries year after year, often in years that other fruit crops are wiped out by weather or disease.

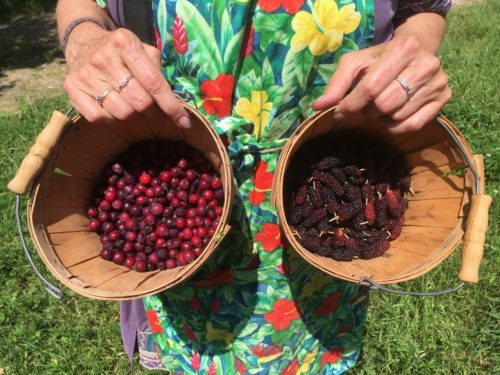
A woman holds a basket of ripe juneberries in her left hand and a basket of ripe mulberries in her right hane.

Juneberries (left) and mulberries ripen at the same time—in May, not June! Photo: Guy Ames, NCAT.

As with most small berries, the commercial viability of juneberries will revolve around harvesting costs. In Canada, researchers hope to find techniques and cultivars that will lead to the uniform ripening that allows mechanical harvesting. Elsewhere and until that happens, individual farmers will have to figure out ways to efficiently pick and effectively market the fruit to make juneberry production a viable money-making proposition. But that should not preclude gardeners and homesteaders from planting these easy-to-grow and highly productive berry plants in their gardens for home use.

Related ATTRA Resources

Fruit Trees, Bushes, and Vines for Natural Growing in the Ozarks

A Recap of the Young Farmer National Leadership Convergence

By Luke Freeman, NCAT Horticulture Specialist

Photo at right: Luke enjoying the Colorado snow!

In November I attended the National Leadership Convergence in Boulder, Colorado, hosted by the National Young Farmers Coalition (NYFC). This was a fantastic opportunity to meet other young farmer leaders from across the country and learn about the common issues young and beginning farmers face. This post is long overdue, but I wanted to share some of my thoughts and experiences from the Convergence. I also wanted to share some ideas on how to support beginning farmers.

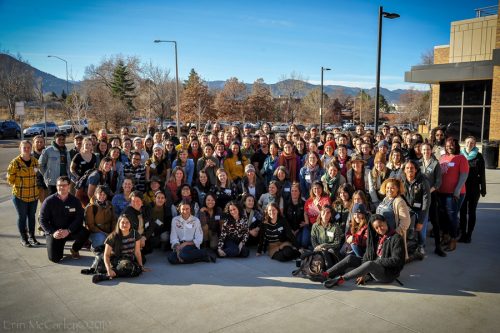
This was the fifth Annual National Leadership Convergence. The event brought 120 farmers and 19 NYFC staff members together from across the country. It was truly amazing to see a diverse group of so many young farmer leaders in one place. The group represented over half of the states in the union. I have been involved with the Arkansas Young Farmers Coalition since 2017 and was happy to meet other chapter members from other states in the Southeast – Louisiana, Tennessee, Georgia, and North Carolina.

Young farmer leaders from across the country gathered in Boulder, CO. Photo by Erin McCarley, 2019.

Acknowledging the Past, Focusing on the Future

Ricardo Salvador from the Union of Concerned Scientists gave a powerful keynote address, “Why the Future of Food and Agriculture Cannot Resemble the History of Food and Agriculture.” He described how the history of agriculture in the United States is stained by injustice and exploitation. But he returned to this message: We cannot make decisions about the past – only the future.

Salvador explained the economics principle that the factors of production include land, labor, and capital; those who own or have access to these resources accumulate wealth. The history of agriculture in America is littered with examples of land being forcibly taken from indigenous people groups. Labor has been appropriated through slavery or exploited through immigration policies. Access to capital has been denied to communities of color. These uncomfortable aspects of our history have caused disparities in wealth accumulation and land ownership, resulting in unequal opportunities for young people who wish to farm.

Ricardo Salvador from the Union of Concerned Scientists delivering the keynote. Photo by Erin McCarley, 2019.

Salvador emphasized that if we wish to create an equitable food system we must perform agriculture differently going forward. Applying this framework to the next generation of farmers means we would insure that beginning farmers have access to land, that they receive fair compensation for their labor, and that they can access capital. I’ve interacted with many young and aspiring farmers. I can confirm that access to land and capital are two of the biggest hurtles for new farmers to overcome. Ensuring equal access to land and capital is an important part of creating a more equitable agricultural system.

Services and Programs for Young and Beginning Farmers

I also attended a workshop on business services offered by NYFC and local chapters. NYFC has put a lot of energy into developing resources on land access for young and beginning farmers. NYFC hopes to continue to expand the scope of its business services for young and beginning farmers. During the breakout session, members of other local chapters shared successful business support programs they have led for farmers in their regions. The Hoosier Young Farmers Coalition hosted a business accelerator where beginning farmers met with a long-range planner, tax advisor, and loan officer. Other chapters have collected wholesale and retail price lists to give beginning farmers examples of how to price their produce. Chapters also have connected beginning farmers with accounting and business planning support at local universities.

Further Information

At NCAT our agriculture specialists often host trainings for beginning farmers on whole farm planning, recordkeeping, accessing USDA resources, and applying for farm loans. Over the years we have developed dozens of resources for beginning farmers on running the business side of a farm. These are available on our ATTRA Marketing and Business topic page.

One of my take-aways from the conference was that young and beginning farmers continue to need business training and farm planning services. The diverse group of young farmers emerging today needs these resources to help them access the federal programs created to serve them. Fewer barriers can lead to more equitable distribution of land and capital among new farmers.

Are you a beginning farmer who has questions about marketing, business, or production? Please don’t hesitate to contact me or one of the other ATTRA Sustainable Agriculture specialists. You can call our help line at 800-346-9140 or email askanag@ncat.org. We’re here to help!

NCAT, the United States Botanic Garden, and City Blossoms are proud to release their new Greenhouse Manual: An Introductory Guide for Educators.

Greenhouse Manual CoverThe manual is an easy-to-use guide designed to help educators with access to educational greenhouses. The manual has answers to questions about:

  • planting gardens,
  • growing for Farm to School programs, and
  • integrating plant science into an existing curriculum.

The goal of the manual is to help educators maximize the potential of new and existing school greenhouses. It opens with a basic explanation of greenhouses. There are explanations on how to integrate greenhouse use into classroom and out-of-classroom learning. It contains lesson plans and information on:

  • greenhouse operation,
  • growing plants,
  • starting seeds,
  • plant nutrition,
  • disease and pest management,
  • greenhouse budgeting, and
  • succession planting.

“NCAT has been thrilled to bring our expertise to the efficient and curriculum-based use of educational greenhouses,” said Andy Pressman, NCAT Northeast Regional Director and contributing author to the manual.

The greenhouse manual can be downloaded, for free, at https://attra.ncat.org/product/usbg-greenhouse-manual/.